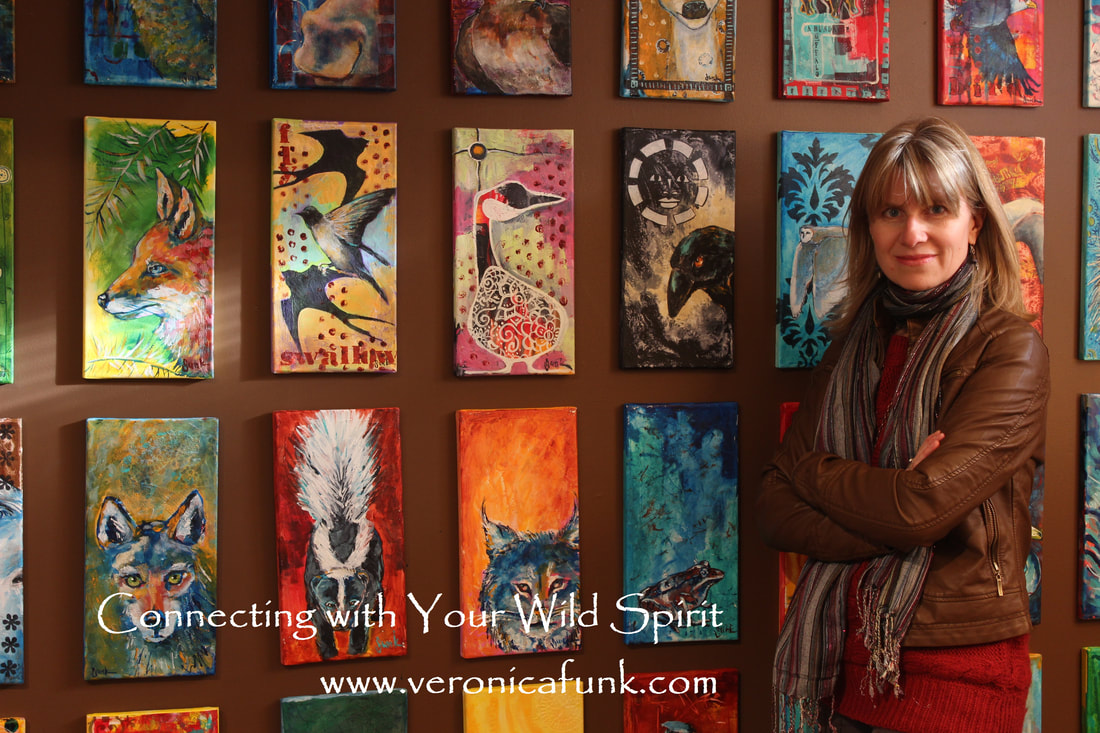
PAINTING ANIMALS
I grew up in an Indigenous region in northern Canada where I was taught by local grandmothers to bead and weave and to pay attention to the plants and animals of my surroundings. Occasionally a bear or wolf or wolverine, among other animals, would wander through town, something that still happens in my community.
As a young girl I was inspired by ravens. Each morning I saw one in front of my house and he would walk nearby, being as curious about me as I was about him. And he would chatter as I walked through the forest. When I grew up I often dreamed that a raven landed on a snow covered branch over my head.
Finding your métier or heart map is important as an artist. That thing inside of you that knows exactly where and what you should do at all times. This is the same thing you do regardless of time, energy, space. There is no need for excuses as this work is necessary, not only for you but a gift to everyone around you.
SUPPLIES:
Gesso
DAP Spackling
Gel medium
Palette knife (mixing tool)
Stencils (optional)
Sanding block
Rubbing alcohol + dropper
Acrylic paint
Paintbrushes (1/4” + 1” flat + liner)
Heat gun or blow dryer
Water dish
Spray bottle
Rag
Paint pens or Sharpees
Gesso
DAP Spackling
Gel medium
Palette knife (mixing tool)
Stencils (optional)
Sanding block
Rubbing alcohol + dropper
Acrylic paint
Paintbrushes (1/4” + 1” flat + liner)
Heat gun or blow dryer
Water dish
Spray bottle
Rag
Paint pens or Sharpees
HOW TO:
PREPARATION
Before I begin work in my studio each morning, I follow a few rituals which I created for myself…to make myself a cup of green tea, to light a beeswax candle, and to refresh my space with sweet grass spray. Growing up in the north, for any special occasion an elder or grandmother would bless the occasion with a smudging ceremony by lighting cedar and blessing us with the words:
“When the smoke clears I will only speak the beauty of you…
When the smoke clears I will only see the beauty of you…
When the smoke clears I will only hear the beauty of you.”
~ Cree Smudging Ceremony
Because my husband is severely allergic to smoke, I prefer to use a sweet grass spray which was created by a Cree herbalist…it smells heavenly and because the sense of smell is strongly connected to memory, I find that following these small rituals connects me to my creative mind quickly and brings a sense of calm and peace to my space.
Also, I tend to clean my studio at the end of my working session so that I am prepared to walk in and immediately focus on creative work in the morning without the need to tidy first which serves three purposes…one is so that the space feels peaceful instead of cluttered and just another job on my list of to-do items, two is so that I can begin creating immediately without having a chore to complete first, and three is so that my tools like brushes and paint are well taken care of so that they last longer and work better.
STEP 1
I like to begin working in my journal by adding some texture to the pages. Because gel media can be very ‘sticky’ even once it’s dry (pages can stick together) I like to add another medium to it, sometimes modeling paste and other times spackling (which is much less expensive). Both those media will crack on a flexible substrate (like paper and fabric) but I find that when I add gel media to them, they become more flexible. I like using a coarse bristle brush to create lovely brush marks, but also to use stencils along with a palette knife using a thin coat of the mixture to leave raised patterns. This has to dry for at least an hour. Once dry, I coat the entire page with gesso.
STEP 2
While my pages are drying, I begin researching my animal. First I like to quiet and center myself to pay attention to the animals that have shown up in my life over the past few days. I like to use a form of journaling known as free writing, just writing as thoughts come to me while I consider whether an animal has crossed my path recently or that I connect or identify with? What is it about that specific animal that I connect with…colour, pattern or form? If colour, what does that colour symbolize? If pattern, does it remind me of something else? If form, does its form replicate a form that I am surrounded by? Does it bring up memories of my youth?
Recently we visited the zoo where the peacocks were in abundance, preening in all their glory. The light reflected off their radiant tails and I was struck by their beauty. After that visit, images of peacocks kept showing up for me in china patterns, fabric, and books and the word peacock kept showing up in stories and on television and in movies. I realized I needed to pay attention so I began to research the meaning.
STEP 3
Though I do enjoy preparing my surface, I really have fun once I start adding colour. Some of my favorite colours for beginning artwork are the heavy staining ones such as alizarin crimson, pthalo or Prussian blue, quinacridone magenta and dioxazine purple. I tend to prefer heavy body paints as they can be thinned with water or thinning mediums. One of my favorite ways to fill a surface with colour is to thin paint with a little water and brush it onto the surface, spray it with water and then allow to sit for a moment. Then, I tilt the surface to allow the paint to run down. I still manipulate the paint with my brush but it’s the drips that interest me. Add a few colours and allow to dry. NOTE: If you don’t want muddy colours like greys or browns, use a layer of warm (orange, yellow, red) allow to dry (or dry with heat gun or hair dryer) and followed by a layer of cool (blue, green, purple), or vice versa. You can repeat these steps for several layers of colour and pattern.
STEP 4
Many years ago my mentor suggested I put away my drawing utensils and use my brush and paint to draw directly onto my painting surface in order to loosen up and to trust my creative brain. When I work on canvas I keep my spray bottle and a rag nearby in case I want to ‘erase’ what I’ve done, but painting over any errors works just as well and adds interest to the final piece.
STEP 5
This is an optional way to add pattern, but I like to prepare a small dish of rubbing alcohol and a dropper. After an initial layer of colour has dried on my surface, I prepare a second paint colour by thinning it to the consistency of cream. I paint a layer of this colour on my surface and immediately use the dropper to place drops of alcohol strategically on the paint and watch it separate into circles.
STEP 6
Once this layer of paint has dried, I begin adding shadows and highlights to give form to my shape paying attention to which direction the light would be coming from and placing all my highlights on that side with a minor reflected light on the opposite. I add final details and touches with a liner brush and/or paint pens, adding a highlight on the animal eye(s) last.
STEP 7
After the image has completely dried (I usually give it 24 hours), I will add some of the information I’ve gathered on the meaning of the animal in order to use this as a guide in my life. To add the title, I like to type the animal name into a MS Word document or online font generator until I find a font that I feel will complement my image. Peacock reminds us that true beauty comes from within and to shine boldly. Some of my favorite writing implements are paint pens, Sharpees and a calligraphy or fine liner paintbrush.
Ravens and crows have been part of my life for my entire childhood and I feel connected to them. Recently we had a porcupine living in our lilac bush for a week and I learned that they signify faith and trust and the need to let go of criticism. Every summer a rabbit lives in our garden, they represent creative energy, commitment and new beginnings. Both messages have come at times that I needed to hear them.